Quick Start: Write Syslog Messages to Microsoft SQL Server#
Use this tutorial when you want a hands-on setup that turns one known syslog message into rows in Microsoft SQL Server with a reproducible table and field mapping.
Question#
How do I quickly write WinSyslog syslog messages to Microsoft SQL Server?
Answer#
Create one ODBC System DSN, point WinSyslog at one SQL Server table, map the syslog properties to the target columns, send one test message, and verify the row in SQL Server. This tutorial uses a fixed demo database so you can reproduce the result immediately.
At a glance#
Database:
WinSyslogDemoTable:
dbo.WinSyslogIncomingDSN:
WinSyslogDemoInput: one RFC 5424 syslog message
Output: one row with raw and structured message columns
Goal#
At the end of this procedure, WinSyslog will:
receive a test syslog message
write that message into Microsoft SQL Server through an ODBC System DSN
store both the raw message and a structured view of the same event in a simple database table
What you will build#
a SQL Server database named
WinSyslogDemoa table named
dbo.WinSyslogIncomingan ODBC System DSN named
WinSyslogDemoa WinSyslog ruleset with one Write to Database action
a repeatable test row you can query in SQL Server
Sample message and output#
This quick start uses a single RFC 5424-style syslog message so the database row is easy to recognize.
Sample input message:
<134>1 2026-04-01T08:15:00Z fw01 sshd 1234 ID47 - Accepted password for alice from 192.0.2.10 port 55221
The example table stores the same event twice:
once as the raw message
once as the parsed message text and header fields
The mapping is intentionally small and explicit:
timereportedbecomesreceived_atsourcebecomessource_hostsyslogfacility_textbecomesfacility_textsyslogpriority_textbecomesseverity_textsyslogappnamebecomesapp_namerawsyslogmsgbecomesraw_messagemsgPropertyDescribedbecomesmessage_text
Expected output in SQL Server:
received_at   = 2026-04-01 08:15:00
source_host   = fw01
facility_text = Local0
severity_text = Informational
app_name      = sshd
raw_message   = <134>1 2026-04-01T08:15:00Z fw01 sshd 1234 ID47 - Accepted password for alice from 192.0.2.10 port 55221
message_text  = Accepted password for alice from 192.0.2.10 port 55221
Prerequisites#
Microsoft SQL Server
SQL Server Management Studio (SSMS) if you want the GUI-based SQL workflow
Microsoft ODBC Driver 18 for SQL Server, or a compatible Microsoft SQL Server ODBC driver installed on the WinSyslog host
Database credentials with permission to connect, insert rows, and create tables
Access to the WinSyslog configuration client on the host where WinSyslog runs
Required downloads#
If you do not already have the Microsoft components installed, use these official download pages before you start the tutorial:
Microsoft SQL Server downloads
Use the Express edition on this page if you need a free local SQL Server instance for the demo database.
-
Use SSMS if you want to create the database and table in a GUI. The article includes the current direct download link.
Microsoft ODBC Driver for SQL Server
WinSyslog writes to SQL Server through ODBC, so install the driver that matches the WinSyslog host architecture.
Steps#
Create the target database and table in SQL Server.
Open SSMS and connect to the SQL Server instance that should receive the WinSyslog data.
Run the following SQL script to create the demo database and table:
IF DB_ID(N'WinSyslogDemo') IS NULL
BEGIN
    CREATE DATABASE WinSyslogDemo;
END
GO

USE WinSyslogDemo;
GO

IF OBJECT_ID(N'dbo.WinSyslogIncoming', N'U') IS NULL
BEGIN
    CREATE TABLE dbo.WinSyslogIncoming (
        received_at datetime2(0) NOT NULL,
        source_host nvarchar(255) NOT NULL,
        facility_text nvarchar(32) NULL,
        severity_text nvarchar(32) NULL,
        app_name nvarchar(128) NULL,
        raw_message nvarchar(max) NULL,
        message_text nvarchar(max) NOT NULL
    );
END
GO
If you prefer the command line, save the same script locally as
create-winsyslog-demo-table.sqland run it withsqlcmd:sqlcmd -S localhost -E -i .\create-winsyslog-demo-table.sql
If you already use the PowerShell
SqlServermodule, this is the same step withInvoke-Sqlcmd:Invoke-Sqlcmd -ServerInstance localhost -InputFile .\create-winsyslog-demo-table.sql
Create and test an ODBC System DSN on the WinSyslog host.
If you want to create the DSN from PowerShell instead of the GUI, run the helper script below in an elevated PowerShell session on the WinSyslog host. It creates a System DSN named
WinSyslogDemoand can be adjusted for a different server or driver if needed.<# .SYNOPSIS Creates the WinSyslogDemo ODBC System DSN for the WinSyslog quick start. .DESCRIPTION Run this script in an elevated PowerShell session on the WinSyslog host. It creates or replaces a System DSN by using the built-in WDAC ODBC cmdlets. The script keeps credentials out of the DSN. Use -UseTrustedConnection only if you want the DSN itself to use Windows authentication for connection tests. #> [CmdletBinding()] param( [string]$Name = 'WinSyslogDemo', [string]$Server = 'localhost', [string]$Database = 'WinSyslogDemo', [string]$DriverName = 'ODBC Driver 18 for SQL Server', [ValidateSet('32-bit', '64-bit')] [string]$Platform = '64-bit', [switch]$UseTrustedConnection ) $dsnProperties = @( "Server=$Server", "Database=$Database" ) if ($UseTrustedConnection) { $dsnProperties += 'Trusted_Connection=Yes' $dsnProperties += 'TrustServerCertificate=Yes' } $existingDsn = Get-OdbcDsn -Name $Name -DsnType System -Platform $Platform -ErrorAction SilentlyContinue if ($null -ne $existingDsn) { $existingDsn | Remove-OdbcDsn -ErrorAction Stop } Add-OdbcDsn -Name $Name ` -DriverName $DriverName ` -DsnType System ` -Platform $Platform ` -SetPropertyValue $dsnProperties ` -PassThru ` -ErrorAction Stop | Out-Null Write-Host "Created System DSN '$Name' on $Platform with driver '$DriverName'." Write-Host "Open Data Sources (ODBC), test the DSN, and then select it in WinSyslog."
After the script finishes, open Data Sources (ODBC) and test the new System DSN before you continue.
If the DSN uses Windows authentication, remember that WinSyslog normally runs under the default Windows
Local Systemservice account unless you changed it. A successful interactive admin test does not prove that the WinSyslog service can connect to SQL Server.For a remote SQL Server, either grant SQL access to the WinSyslog service account context, change the WinSyslog service to run under an account that already has SQL access, or use SQL authentication instead. The practical verification step is to restart the WinSyslog service, send a test message, and then check whether the row is inserted.
You can also run this small PowerShell connection test against the DSN:
$connection = [System.Data.Odbc.OdbcConnection]::new('DSN=WinSyslogDemo;')
$connection.Open()
$connection.Close()
Write-Host 'DSN connection test succeeded.'
If you prefer the GUI instead, use these steps:
Open Data Sources (ODBC) on the WinSyslog host.
Create a new System DSN for SQL Server and name it
WinSyslogDemo.Select the Microsoft SQL Server driver that matches your environment, for example Microsoft ODBC Driver 18 for SQL Server.
Point the DSN to the SQL Server instance and database created in the previous step.
Complete the DSN wizard and use its built-in connection test.
Create or choose the WinSyslog ruleset whose messages should be stored.
If you are starting from scratch, create a new ruleset for the database action.
Open the
Syslog serverservice that should receive the test message and bind it to that same ruleset.Make sure that service is enabled before you send the first test message.
If you already have a working ruleset, confirm that the receiving service is bound to the same ruleset that holds the database action.
Add a Write to Database action to that ruleset.
Configure the database action.
Select the ODBC System DSN
WinSyslogDemo.Enter the database credentials if the DSN or driver requires them.
Set the table name to
dbo.WinSyslogIncoming.Keep the SQL statement type at the normal
INSERTpath.Leave output encoding at
System Defaultunless you know you need a different one.Do not use Create Database for this quick start because the table is created by the SQL script above.
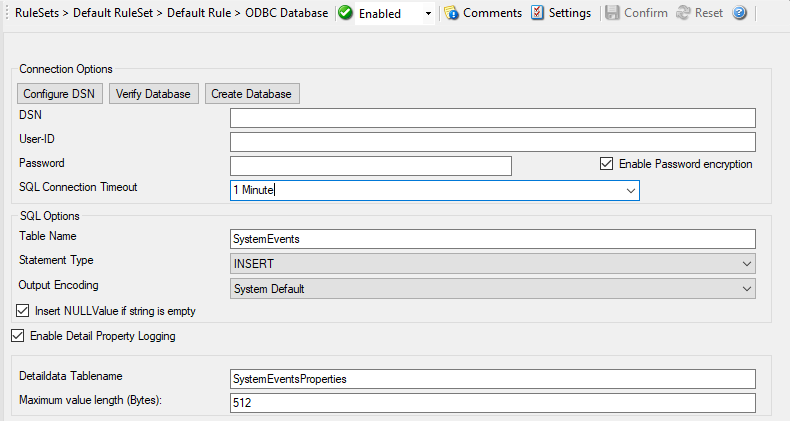
The connection tab is the main place to select the DSN, enter credentials, and verify the connection before you save the action.
Configure the field list so it matches the demo table.
Remove any fields that do not belong in the demo table.
Use these mappings:
received_at->DateTime->timereportedsource_host->varchar->sourcefacility_text->varchar->syslogfacility_textseverity_text->varchar->syslogpriority_textapp_name->varchar->syslogappnameraw_message->text->rawsyslogmsgmessage_text->text->msgPropertyDescribed
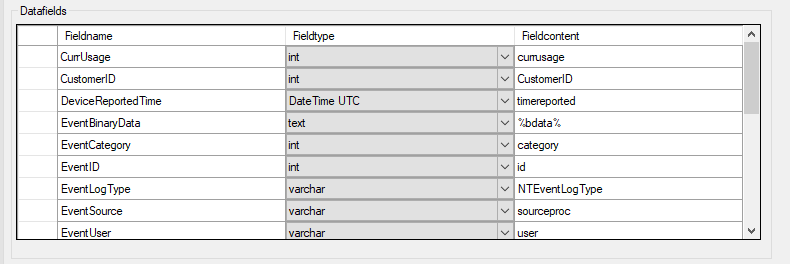
The datafields tab is where you turn one incoming syslog event into the structured columns shown in the example table.
Save and apply the configuration.
Restart the WinSyslog service if your environment or workflow requires it.
Send a test message.
For the fastest first verification, use Tools -> Send Syslog Test Message.
To reproduce the sample row above, send an RFC 5424 syslog message with the same values from any syslog client.
Verify the inserted rows in SQL Server.
Open SSMS and query the demo table.
Confirm that the row contains the expected values.
SELECT TOP (10) *
FROM dbo.WinSyslogIncoming;
If you prefer the command line, run the same check with
sqlcmd:sqlcmd -S localhost -E -Q "SELECT TOP (10) * FROM dbo.WinSyslogIncoming;"
Verification#
The ODBC System DSN test succeeds.
The WinSyslog action connects successfully to the DSN.
A test message produces a new row in
dbo.WinSyslogIncoming.The row contains both the raw syslog line and the structured message columns.
Common issues#
The DSN was created as a user DSN instead of a System DSN. See FAQ: Why Does My WinSyslog Database Setup Fail?.
The DSN points to the wrong SQL Server instance or database. See FAQ: Why Does My WinSyslog Database Setup Fail?.
The SQL Server account can connect but does not have permission to create rows. See FAQ: Why Does My WinSyslog Database Setup Fail?.
The table name in WinSyslog does not match the SQL table name exactly. See FAQ: Why Does My WinSyslog Database Setup Fail?.
The field list still contains the default schema rows instead of the demo table columns. See FAQ: Why Does My WinSyslog Database Setup Fail?.
The message sender is not reaching the same ruleset that holds the database action. See FAQ: Why Does My WinSyslog Database Setup Fail?.
The data type in the table is too short for the message text and truncation occurs. See Tutorial: Integrate WinSyslog with a Custom Database Schema.
Next step#
If this quick start works and you want to adapt the schema to your own application, continue with: