Microsoft 365 OAuth for email alerts#
Use this guide to configure a Send Email action in WinSyslog, WinSyslog, or EventReporter with Microsoft 365 OAuth application permissions. Follow it only when the installed classic Adiscon WinForms UI offers Microsoft 365 OAuth (application) and the installed product service also supports application OAuth. Check both components and their release information; this guide assigns no product version or general availability. It does not cover WinSyslog-ng or another client interface.
This customer procedure uses the Exchange Online application-permission
method: the Entra app gets Office 365 Exchange Online
SMTP.SendAsApp, and Exchange grants its service principal access to one
mailbox. It uses an app-only SMTP token, not Microsoft Graph mail
permissions or delegated SMTP.Send, and has no username/password
fallback. You do not need an Adiscon developer environment, development
scripts, or a sample VBS file.
1. Confirm prerequisites#
Choose an existing licensed user mailbox or ask the Microsoft 365
administrator to create one for alerts. In the Microsoft 365 admin center,
open Users > Active users and select Add a user, or open the
existing user. Assign a license that includes Exchange Online and confirm
its primary SMTP address. This guide uses alerts@example.com. The SMTP
username and sender must both be that mailbox’s primary address; choose a
separate destination such as operations@example.com.
Confirm these administrators and access before starting:
An Entra administrator authorized to register/manage an app, add an Exchange Online application permission, and grant tenant-wide admin consent.
An Exchange Online administrator authorized to register the service principal and grant the mailbox permissions below. This is often a member of Organization Management or a delegated role group.
The recipient address, which may be another mailbox or a distribution list.
Network access from the service machine to the Microsoft identity token endpoint over HTTPS (typically TCP 443) and Exchange Online SMTP submission over TCP 587.
If the authentication selector is absent, stop and check the installed client and service release information or contact Adiscon support. Do not infer availability from an unreleased runtime change.
2. Register or select an Entra app#
In the Microsoft Entra admin center, open Entra ID > App registrations. Select New registration, enter a name, choose Accounts in this organizational directory only, and select Register. This app-only setup needs no redirect URI. You may instead use an app already registered in your own tenant.
Record the IDs and secret as follows:
Value |
Where to find it and how to use it |
|---|---|
Directory (tenant) ID |
App registration Overview. Enter this GUID in the Adiscon client; it is not used by the Exchange commands below. |
Application (client) ID |
App registration Overview. Enter this GUID in the client and use it to find the Exchange service principal. |
Enterprise application Object ID |
Open Enterprise applications, search by the Application (client) ID, and record Object ID from that app’s Overview. Use it for Exchange registration. It is different from the App registrations Object ID. |
Client secret Value |
In the app registration, open Certificates & secrets > Client secrets > New client secret. Add a description, choose an expiry that follows your organization’s policy, and select Add. Copy Value while visible; ID cannot be used as the secret. Record expiry and schedule rotation before then. Enter the Value only in the Adiscon password field. Never put it in a command, script, command-line argument, or support log. |
The following four Microsoft Learn screenshots are reference examples; labels can differ, and they do not show this tenant’s current settings.
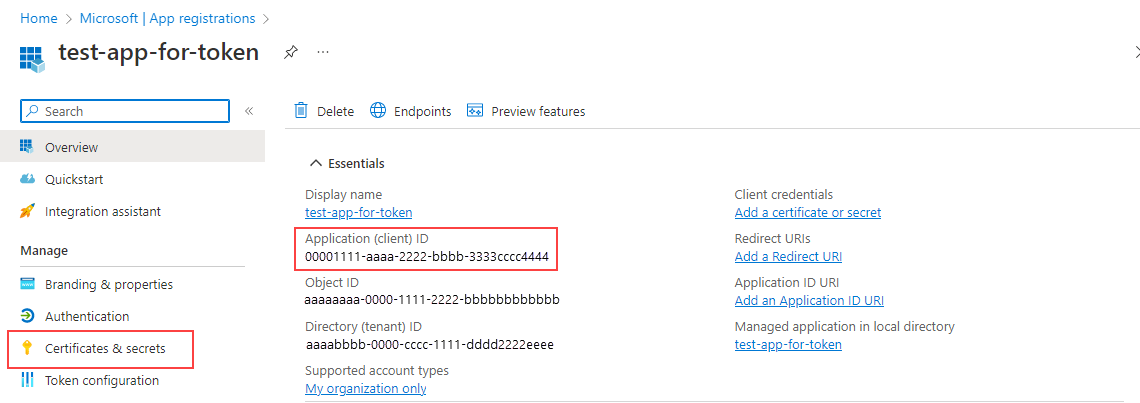
Microsoft Learn reference example (cropped): record your own Directory and Application IDs from these fields; shown values are illustrative. The App registrations Object ID is not the Enterprise application Object ID required by Exchange.#
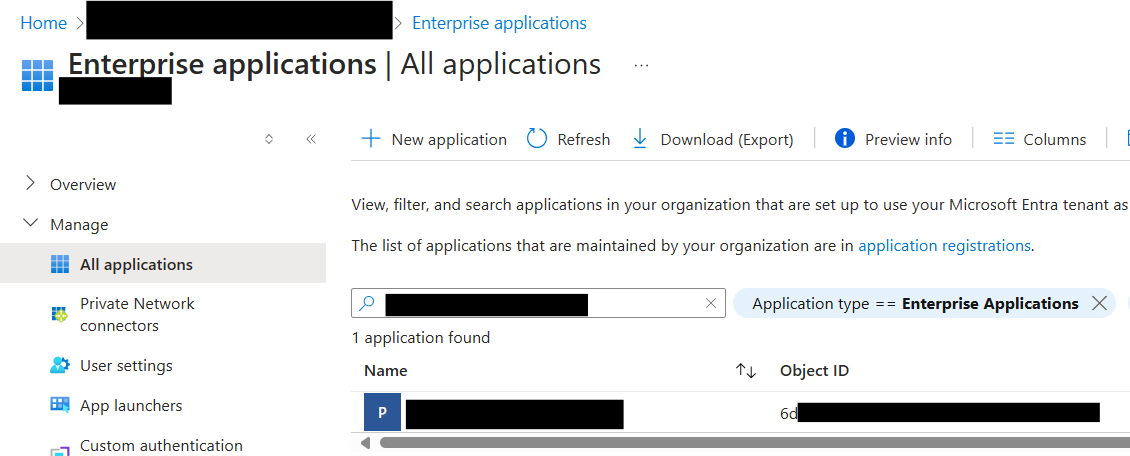
Microsoft Learn reference example (cropped): use the Enterprise application Object ID when registering the Exchange service principal.#
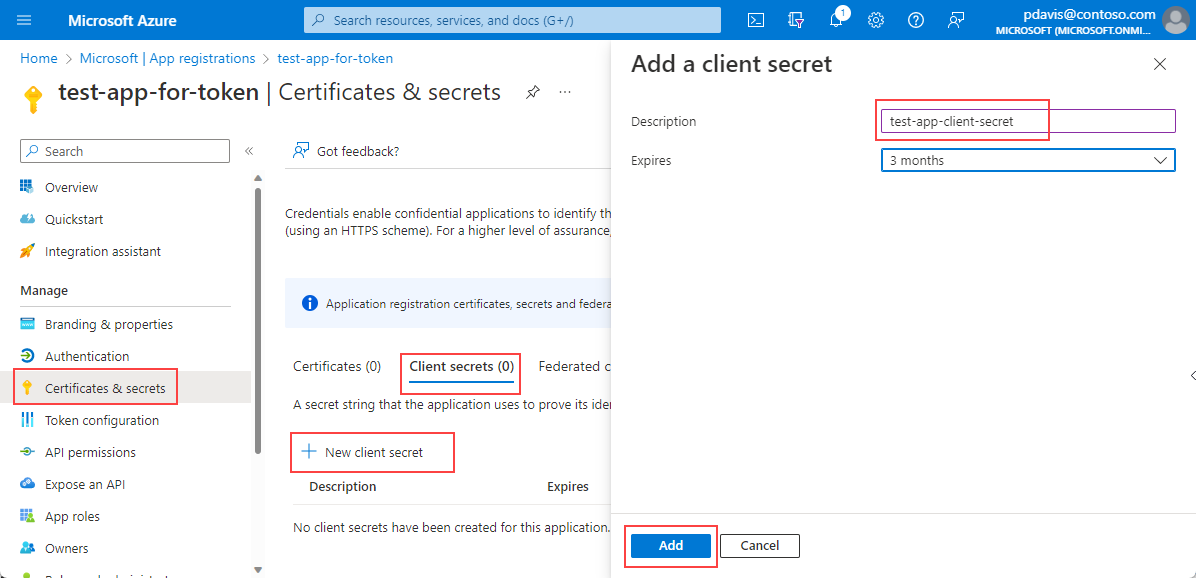
Microsoft Learn reference example: the expiry shown is illustrative. The dialog does not show the secret Value; copy it once when creating the secret.#
3. Add permission and grant admin consent#
In the app registration, open API permissions > Add a permission >
APIs my organization uses. Select Office 365 Exchange Online >
Application permissions, select SMTP.SendAsApp, and add it. Do not
choose Microsoft Graph or delegated SMTP.Send for this setup.

Microsoft Learn reference example (cropped): select only SMTP.SendAsApp
for this guide. Yes in Admin consent required means the
permission requires admin consent; it does not show consent status.
Verify Granted in API permissions.#

Before administrator consent, adding SMTP.SendAsApp is
insufficient. This German-language example shows Not granted.
Microsoft Graph User.Read is visible but unrelated and not required.#
Select Grant admin consent for <your tenant> and confirm. Before continuing, verify the permission status is Granted for <your tenant> in API permissions. A pending or not-granted permission is not ready for Exchange configuration.
4. Register the Exchange service principal and grant mailbox access#
Use Exchange Online PowerShell from an administrator workstation. The commands are examples for the Exchange administrator to review and run; they do not run from this guide. Run all four blocks in the same authenticated PowerShell session. The tenant ID and client secret are not used in these commands.
Prepare the session. Replace the placeholders with the Application (client) ID and the Object ID from Enterprise applications. Connect interactively as an authorized administrator:
$AppId = '<application (client) ID GUID>'
$EnterpriseAppObjectId = '<Enterprise application Object ID GUID>'
$Mailbox = 'alerts@example.com'

if (-not (Get-Module -ListAvailable -Name ExchangeOnlineManagement)) {
    Install-Module -Name ExchangeOnlineManagement -Scope CurrentUser -ErrorAction Stop
}
Import-Module ExchangeOnlineManagement -ErrorAction Stop
Connect-ExchangeOnline -UserPrincipalName '<administrator UPN>' `
    -ErrorAction Stop
Register or reuse one service principal. Zero matches creates it, one match reuses it, and more than one stops for administrator review. The registered Object ID must match the Enterprise application Object ID:
$servicePrincipals = @(Get-ServicePrincipal -ErrorAction Stop |
    Where-Object { $_.AppId -eq $AppId })
if ($servicePrincipals.Count -gt 1) {
    throw 'More than one Exchange service principal has this application ID. ' +
        'Stop and resolve the duplicate.'
}
if ($servicePrincipals.Count -eq 0) {
    New-ServicePrincipal -AppId $AppId -ObjectId $EnterpriseAppObjectId -ErrorAction Stop
    $servicePrincipals = @(Get-ServicePrincipal -ErrorAction Stop |
        Where-Object { $_.AppId -eq $AppId })
}
if ($servicePrincipals.Count -ne 1) {
    throw 'The Exchange service principal was not created or cannot be ' +
        'uniquely identified.'
}
$exoServicePrincipal = $servicePrincipals[0]
if ($exoServicePrincipal.ObjectId -ne $EnterpriseAppObjectId) {
    throw 'The Exchange service principal Object ID does not match the ' +
        'Enterprise application Object ID.'
}
Grant access to this mailbox only. The checks stop for explicit Deny
permissions and add an Allow only when it is missing. Use the Exchange
service principal’s Identity for both grants, never its App ID or Entra
Object ID:
$mailboxPermissions = @(Get-MailboxPermission -Identity $Mailbox `
    -User $exoServicePrincipal.Identity -ErrorAction Stop)
if (@($mailboxPermissions | Where-Object {
    $_.AccessRights -contains 'FullAccess' -and $_.Deny
}).Count -gt 0) {
    throw 'A FullAccess deny permission exists for this mailbox. ' +
        'Stop for administrator review.'
}
$fullAccessPermission = @($mailboxPermissions | Where-Object {
    $_.AccessRights -contains 'FullAccess' -and -not $_.Deny
})
if ($fullAccessPermission.Count -eq 0) {
    Add-MailboxPermission -Identity $Mailbox `
        -User $exoServicePrincipal.Identity `
        -AccessRights FullAccess -ErrorAction Stop
}

$recipientPermissions = @(Get-RecipientPermission -Identity $Mailbox `
    -Trustee $exoServicePrincipal.Identity -ErrorAction Stop | Where-Object {
    $_.AccessRights -contains 'SendAs'
})
if (@($recipientPermissions | Where-Object {
    $_.AccessControlType -eq 'Deny'
}).Count -gt 0) {
    throw 'A SendAs deny permission exists for this mailbox. ' +
        'Resolve it before continuing.'
}
$sendAsPermission = @($recipientPermissions | Where-Object {
    $_.AccessControlType -eq 'Allow'
})
if ($sendAsPermission.Count -eq 0) {
    Add-RecipientPermission -Identity $Mailbox `
        -Trustee $exoServicePrincipal.Identity `
        -AccessRights SendAs -ErrorAction Stop
}
Verify the result. Stop and recheck with the administrator if any
check fails or expected permission is missing. Expected results: exactly
one Exchange service principal with the expected App ID and matching
Enterprise application Object ID, FullAccess with Deny set to
False, and SendAs with AccessControlType set to Allow.
$servicePrincipalCheck = @(Get-ServicePrincipal -ErrorAction Stop |
    Where-Object { $_.AppId -eq $AppId })
if ($servicePrincipalCheck.Count -ne 1 -or
    $servicePrincipalCheck[0].ObjectId -ne $EnterpriseAppObjectId) {
    throw 'Expected exactly one matching Exchange service principal. ' +
        'Stop and recheck.'
}
$verifiedFullAccess = @(Get-MailboxPermission -Identity $Mailbox `
    -User $exoServicePrincipal.Identity -ErrorAction Stop | Where-Object {
    $_.AccessRights -contains 'FullAccess' -and -not $_.Deny
})
if ($verifiedFullAccess.Count -eq 0) {
    throw 'FullAccess with Deny=False is missing. Stop and recheck.'
}
$verifiedSendAs = @(Get-RecipientPermission -Identity $Mailbox `
    -Trustee $exoServicePrincipal.Identity -ErrorAction Stop | Where-Object {
    $_.AccessRights -contains 'SendAs' -and $_.AccessControlType -eq 'Allow'
})
if ($verifiedSendAs.Count -eq 0) {
    throw 'SendAs Allow is missing. Stop and recheck.'
}

$servicePrincipalCheck |
    Format-List AppId,ObjectId,Identity,DisplayName
$verifiedFullAccess | Format-Table User,AccessRights,Deny
$verifiedSendAs | Format-List Trustee,AccessRights,AccessControlType,IsInherited
5. Check SMTP AUTH for the mailbox#
Check both mailbox and organization policy:
Get-CASMailbox -Identity 'alerts@example.com' -ErrorAction Stop |
    Format-List SmtpClientAuthenticationDisabled
Get-TransportConfig -ErrorAction Stop |
    Format-List SmtpClientAuthenticationDisabled
The mailbox value determines whether SMTP AUTH is disabled for this mailbox:
Mailbox value |
Meaning |
|---|---|
|
SMTP AUTH is enabled for this mailbox, including when the organization setting disables it. |
|
SMTP AUTH is disabled for this mailbox. |
Blank |
The mailbox inherits the organization setting. |
If an administrator approves enabling SMTP AUTH for this mailbox, set it
per mailbox, then verify the result is False:
Set-CASMailbox -Identity 'alerts@example.com' `
    -SmtpClientAuthenticationDisabled $false -ErrorAction Stop
Get-CASMailbox -Identity 'alerts@example.com' -ErrorAction Stop |
    Format-List SmtpClientAuthenticationDisabled
If the query result is True or blank, stop and ask the administrator to check
the setting and applicable policies. Do not enable SMTP AUTH organization
wide as a shortcut. If Security Defaults or another policy blocks SMTP
AUTH, ask an administrator to decide whether a policy change is
appropriate; do not disable Security Defaults automatically. See
Microsoft’s authenticated client SMTP submission
guidance.
6. Prepare a trusted SMTP CA bundle#
SMTP validates the Exchange server certificate against a PEM CA file. Microsoft identity token requests use Windows HTTPS certificate validation separately and do not use this SMTP file.
On the Windows service machine, download the current PEM from the
curl CA Extract page over HTTPS.
The page links to https://curl.se/ca/cacert.pem and publishes the
current SHA-256 checksum. Download to a temporary location and compare:
Get-FileHash '<downloaded cacert.pem path>' -Algorithm SHA256
After the hash matches, create C:\ProgramData\Adiscon\certs on the
service machine and save the bundle there as cacert.pem. If editing
remotely, this path still resolves on the service host. To identify the
service account without changing or stopping the service, open
services.msc, find the Adiscon product service, and view Properties
> Log On. In the folder’s Properties > Security > Advanced,
1. preserve existing inherited entries, including SYSTEM;
2. add Read & execute for the service account; and
3. ensure Administrators retain Modify access.
Do not remove or reduce existing SYSTEM permissions. The bundle contains
trusted certificate authorities, not the Exchange leaf certificate. Do not
disable certificate or hostname verification to work around a trust error.
7. Configure the Send Email action#
In the classic Adiscon WinForms client, open Rules/Rule Sets > select the rule > Actions > Add Action > Send Email. Add or edit the action, then set Mail Server Options:
Field |
Value |
|---|---|
Mailserver |
|
Mailserver port |
|
SMTP authentication |
Microsoft 365 OAuth (application) |
SMTP Username |
The licensed mailbox’s primary SMTP address, such as
|
Tenant ID (GUID) |
The Entra Directory (tenant) ID. |
Application ID (GUID) |
The Entra Application (client) ID. |
Application client secret |
The secret Value, not its ID. |
SMTP trusted CA file (PEM) |
Verified CA bundle path on the service machine. |
Use a secure connection (SSL) to the mail server |
Enabled. |
Use STARTTLS SMTP Extension |
Enabled. |
In Mail Format Options, set Sender Emailaddress to the same
primary mailbox as the SMTP username. Set Recipient Emailaddress to
the separate destination, for example operations@example.com.
The client masks the secret but stores it with existing reversible credential encoding; this is not strong encryption. Restrict configuration, registry data, exported settings, and backups to administrators and the service account. Rotate the secret before expiry and update the action. Never include the secret or access tokens in support evidence.
Test the mail settings from the client#
In the Send Mail action, open Mail Format Options and select Send test mail…. Review the current values in the dialog before sending. The test uses the current unsaved mail values and the SMTP settings for the one selected mail-server entry. It sends one message directly from the computer running the client; it does not test connectivity from the configured service computer or send through the service.
The configured trusted CA file must also be readable by the client on the computer running this test. When the configured service later sends mail, its service account must be able to read the CA file on the service computer.
Enter a recipient you can check, review the sender, subject, and message, and select Send test mail once. The result reports whether the SMTP server accepted the message for processing. Acceptance does not confirm inbox delivery; check the recipient mailbox and, if needed, message trace, quarantine, or non-delivery reports before trying again.
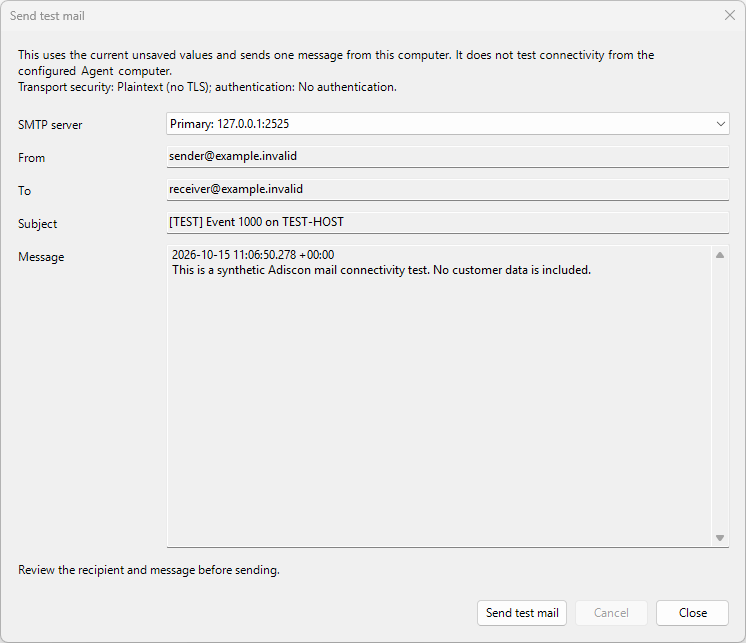
This preview illustrates the dialog only. Its plaintext, no-auth
loopback settings are not for Microsoft 365; use required STARTTLS and
Microsoft 365 application OAuth, shown in the transport summary below.
The example.invalid addresses are placeholders.#

Transport summary from a Classic client test using Microsoft 365 application OAuth and required STARTTLS.#

The SMTP server accepted the test message. This status does not confirm delivery to the recipient’s inbox.#
The Send test mail… command is available only in client builds that include this feature. If it is absent, check the installed client release information or contact Adiscon support.
8. Save, apply, and test one event#
Add the action to a rule matching one deliberate test event. Save and apply configuration through the product’s normal operator workflow. If your deployment requires a service restart, follow its normal change process before testing.
For a controlled syslog example, send one warning-priority event from
test-host.example.com with this message:
[TEST] Backup job DailyBackup finished with warnings: simulated file skipped.
Use event properties in the action’s subject and body:
Subject: [TEST] %source%: %msg%
Body:
Source: %source%
Message: %msg%
Priority: %syslogpriority%
Use Insert Property to confirm properties are available for the event
type. %syslogpriority% applies to syslog; use available Windows event
properties and omit the priority line if it is unavailable. EventReporter
must use an actual Windows event. Save and apply using the normal operator
workflow, trigger the rule once, and check the intended recipient mailbox.
SMTP 235 confirms authentication only. SMTP 250 after DATA
means the server accepted the message for processing, not that it reached
the inbox. Check message trace, quarantine, and non-delivery reports before
repeating a test to avoid duplicate messages.
Troubleshooting#
Symptom or phase |
Checks |
|---|---|
Entra application or missing token / |
Check service OAuth support, tenant ID, application ID, secret Value, and expiry. Never use the secret ID. |
Consent or Exchange identity |
Confirm |
Mailbox authorization or SMTP AUTH rejected |
On the SMTP username/sender mailbox, confirm |
Connection fails before OAuth |
Check outbound TCP 587, STARTTLS, the PEM path and service-account read access, plus certificate chain and hostname validation. Token requests use separate Windows HTTPS trust. A connection or startup failure before an event is processed does not prove OAuth failed. |
Service starts but no delivered message |
Check the installed service supports OAuth, startup/configuration
logs, and whether the rule matched the event. SMTP |
Microsoft also documents Exchange Online application RBAC for SMTP.
That separate model uses the Exchange role Application SMTP.SendAsApp
and a scoped role assignment, without the Entra SMTP.SendAsApp
permission or the mailbox FullAccess and SendAs grants above. Do
not combine the models. See Microsoft’s SMTP onboarding to app RBAC
for the alternative.
Microsoft’s shared mailbox OAuth guidance describes a different flow that gets a token on behalf of a user. Adiscon has not tested it with this app-only setup; this guide uses a licensed user mailbox.
Screenshot credits#
The four Microsoft Learn reference screenshots are cropped or reproduced from Register an application for token-based authentication and Authenticate an IMAP, POP or SMTP application by using OAuth. They are used under CC BY 4.0; see the Azure Monitor documentation license and Exchange documentation license. UI labels and tenant settings may differ.